
— Загрузить
— Работает в таких браузерах как: IE8, IE7, IE6, Safari, Firefox, Chrome.
— Только на белом фоне.
Использование
Для IMG тега применить CSS класс «rounded»
[sourcecode language=’css’] [/sourcecode]
Работает это так
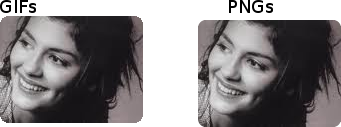
Четыре белых уголка формата GIF располагаются по углам изображения.

Код CSS
[sourcecode language=’css’].rounded_wrapper {position: relative;
}
.rounded_wrapper img {
border-width: 0;
border-style: none;
}
.rounded_wrapper div {
height: 7px;
position: absolute;
width: 100%;
}
.rounded_wrapper .tl {
top: 0;
left: 0;
background: url(img/rounded_corners/tl.gif) no-repeat left top;
}
.rounded_wrapper .tr {
top: 0;
right: 0;
background: url(img/rounded_corners/tr.gif) no-repeat right top;
}
.rounded_wrapper .br {
bottom: 0;
right: 0;
background: url(img/rounded_corners/br.gif) no-repeat right bottom;
}
.rounded_wrapper .bl {
bottom: 0;
left: 0;
background: url(img/rounded_corners/bl.gif) no-repeat left bottom;
}
/* IE6 fix */
.ie6_width .tr {
right: -1px;
}
.ie6_width .br {
right: -1px;
}
.ie6_height .br {
bottom: -1px;
}
.ie6_height .bl {
bottom: -1px;
}[/sourcecode]
Код Javascript
[sourcecode language=’Javascript’]$(‘img.rounded’).one(‘load’,function () {var img = $(this);
var img_width = img.width();
var img_height = img.height();
// строим оболочку
var wrapper = $(‘
‘);
wrapper.width(img_width);
wrapper.height(img_height);
// перемещаем свойство CSS из img в оболочку
wrapper.css(‘float’, img.css(‘float’));
img.css(‘float’, ‘none’)
wrapper.css(‘margin-right’, img.css(‘margin-right’));
img.css(‘margin-right’, ‘0’)
wrapper.css(‘margin-left’, img.css(‘margin-left’));
img.css(‘margin-left’, ‘0’)
wrapper.css(‘margin-bottom’, img.css(‘margin-bottom’));
img.css(‘margin-bottom’, ‘0’)
wrapper.css(‘margin-top’, img.css(‘margin-top’));
img.css(‘margin-top’, ‘0’)
wrapper.css(‘display’, ‘block’);
img.css(‘display’, ‘block’)
// Если значение высоты или ширины нечетное, то для IE6 устанавливаем
if ($.browser.msie && $.browser.version == ‘6.0’)
{
if(img_width % 2 != 0)
{
wrapper.addClass(‘ie6_width’)
}
if(img_height % 2 != 0)
{
wrapper.addClass(‘ie6_height’)
}
}
// изображение оболочки
img.wrap(wrapper);
// добавляем округление углов
img.after(‘
‘);
img.after(‘
‘);
img.after(‘
‘);
img.after(‘
‘);
}).each(function(){
if(this.complete) $(this).trigger(«load»);
});[/sourcecode]
Примечание
Для более плавных углов можно использовать прозрачные изображения формата PNG. Для сравнить:
Автор: Jérôme Jaglale